Saturday, August 3, 2013

Thinlits Card Dies! WOW!

Flip flop cards or swing cards are all over pinterest these days.  They involve tricky cuts and scoring in just the right places.  Well, Stampin' Up! has simplified the process with their lates Big Shot accessory:  Thinlits Card Dies!
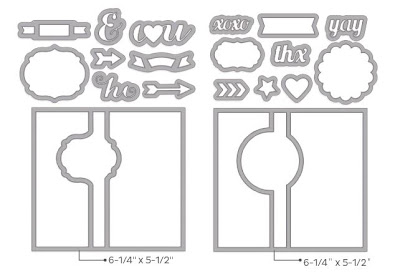
So above is a cute picture of an example of a flip flop card.   And here is a video showing just how easy they are to use:

I I am not a fan of fancy cards because if I can't get it to fold perfectly then forget it. Well, now it is going to be a cinch. I look forward to trying them out.
This is what they look like: 


See how there are two different designs?  One is a label and the other is a circle.  They each come with other thinlit dies that can be used on your flip cards or on other projects.  Both dies have several stamp sets that they coordinate with.  To read all the details you can click the following to download the PDF:  click here.  
The Label Thinlit Card Die is #133479, and the Circle Thinlit Card Die is #133480.  Both are $32.95.

Have a Creative Day!
-Staci

Friday, May 31, 2013

The Best of Both Worlds!

Today marks the last day of the 2012-2013 Stampin' Up! Catalog.  BUT you can also begin ordering from the new 2013-2014 Annual Catalog today!
You can find the links to the PDF and Flip Book versions of the catalog on the sidebar.  Remember that you can shop anytime you like by ordering online. 
On the sidebar, you will also find a link to the Supply List for the new catalog.  So if you are wondering, "How did they make the card on p.36?"  You can take a peek at the supply list and see what was used.  Usually this will help you determine how a project was made. 

As a final hurrah! I made two cards using retiring items.  The first is a Birthday Card using Circle Circus and Word Play.  Both are sadly retiring.  Technically, you can purchase these sets through June 3rd.....but I would not wait too long to order.  The second card is based on the first...I changed the sentiment and turned the card on its side.  The sentiment is from a long retired hostess set but I am fairly confident that you have a similar sentiment in your stash. 
I designed the Father's Day card for my little guys to do as a craft project.  It was the first time that I have given them a "class."  Usually, they don't have to follow a design.  Logan, my 7 year old, was ready!  Gavin, my 5 year old, was very reluctant to follow my instructions.  In the end, they both turned out great cards and had fun....I would post pictures of their cards too but they couldn't wait to get them in the envelopes.


I am not going to include a full list here due to lack of time to write this post, but here are the important retiring items:
Stamp Sets:  Circle Circus, Word Play
Paper: Summer Smooches DSP
Accessories: Brights Designer Buttons

Have a Creative Day!
-Staci

Wednesday, April 24, 2013

The retired lists have arrived!


Retiring Product Lists now available!
The buzz of excitement is in the air!  As Stampin' UP! demonstrators, we are all anticipating the upcoming new annual catalog.  I am in the process of pre-ordering items from the new catalog and I look forward to getting my hands on new product!

At the same time we have to say good-bye to many of our favorite stamp sets.  So here is the sad list of stamp sets that are retiring from the current annual catalog. Here is the pdf of retiring stamp sets. These sets will be available until June 3rd.

Many accessories are also retiring. These are only available while supplies last.  You will want to order these right away. You can email me your order or choose shop now from my website.  Please note that there are discounted items on the first part of the list. Also note that x's at the right hand side indicate that the item is no longer available. Click here for the PDF.

Get $155 in product for only $99 by joining my team today.  When you become a demonstrator you can see the upcoming catalog now and you can also order select products from it.  You can also include these items in your starter kit.  Click here to reach my "Join the Fun" page.  From that link, scroll down and click on the "sneak peak items" picture.  The download is a little slow- so be patient.  I will probably make another blog post soon about all the benefits of being a demonstrator.  Remember that you can choose to ONLY purchase the starter kit.  You are not obligated to make any further purchases or host parties or hold classes, etc.  There is also no penalty if you drop....so if you want to give it a try- it really is risk-free and you will enjoy all the benefits of being a demonstrator until Oct 31, 2013 (if you choose not to remain active.)  So what are you waiting for?  Contact me if you want to hear more about your options....


Thursday, September 8, 2011

Embossing Folders, Blender Pens, and Cork

I was having fun using my new embossing folders.  Both the houndstooth and the stripes made there debut in the 2011-2012 Idea Book and Catalog (the big one.)  I used the houndstooth embossing folder on the base of the card.  I think you will be able to see it if you click on the picture for a closer view.  I used the stripes embossing folder on the island indigo panels.
I love the cork sheets and was glad that I was able to find a place to work them in.  And look! I even worked in some ribbon (black 1/8" taffeta ribbon!)
I used blender pens and my ink pads to color in the bonsai tree.  If you have never used a blender pen before, then check out this short video:


Stamp sets: Plant Hope
Paper:Very Vanilla, Island Indigo, Basic Black
Ink: Staz On Black, Lucky Limeade, Island Indigo, Crumb Cake, Early Espresso
Accessories: Black 1/8" taffeta ribbon, silver brads, cork sheets
Tools: Blender Pens, Houndstooth and Stripes Embossing Folders, Big Shot

Happy Stamping!
-Staci

Monday, September 5, 2011

Sandpaper and Sponges

This scrapbook layout has my signature grunge feel with lots of stamped elements layered in.  I created this page for when Logan and I traveled to Florida to visit family.  I waited until Logan was about 3 months before making the trip out there.  As a new mom, I was worried about being on the road with a little one.  It turned out to be a great trip and I learned that it is a bit difficult to trapse around Florida with a 3 month old who likes to nurse every 2 hours.
 This page includes a home made embellishment.  I started with a square piece of crumb cake.  I stamped the dots from the Extreme Elements stamp in versamark and embossed with clear embossing powder.  I matted this square with a Night of Navy square.  I punched a hole (with that retired punch that I can't remember the name of) and ran chocolate chip 5/8" grosgrain through it.  Then I added two elements- the compass and the circle brad.  I stamped the compass from the Sentimental Journey set, embossed it, cut it out, and then placed a silver brad in the center.  I added interest to the designer circle brad by rubbing it on the chocolate chip craft pad. It took a long long long time for the ink to dry because the brad is non porous and the ink just sits up on top. 
 In the picture above you will notice the tear right under the embellishment.  It looks like it is there on purpose right?  Well to tell the truth I had to work that tear in because I didn't have a 12" length of crumb cake.  I only had a 8.5 x 11 inch sheet to work with so I basically pieced it together.  So instead of piecing it together at the end I pieced it together part way through.  I then tore it and sponged it to make it look like it fit with the rest of the page.
The title is a combination of the Jayne's Type Alphabet set and one of the words in the Sentimental Journey set.  The letters from this alphabet set are very nice.  I added to the grunge feel by using the kissing technique on the letters.  ie. Ink up the "B" then press the star stamp to the inked "B."  Then stamp the "B."  Don't forget to add stars to the title to add to the layered look!
On the stamped squares I just collaged the images from the extreme elements and sentimental journey sets.  I experimented with different colors for each to give the page more variety. And I sponged around them too -as if I needed to tell you that!

The journaling is handwritten with a Stampin' Write marker I also sanded the Designer Series Paper to get some of that fabulous white core to show through.
I do not think it was intentional at the time of creating this scrapbook page but I made it out of 100% Stampin' Up! products. Go me!  Go me!  Oh yeah.  Oh yeah.  So the Designer Series Paper and the sentimental journey stamp set and the designer brads are retired (but you can easily substitute them with other items.)
Thanks for looking at my artful, grungey, yet baby scrapbook layout! 

Stampin' Up! products used:
Stamp sets:  Jayne's Type Alphabet, Sentimental Journey, Extreme Elements
Paper:  Crumb Cake, Night of Navy, Chocolate Chip DSP, Bashful Blue
Ink: Bashful Blue, Versamark, Night of Navy, Chocolate Chip (Classic and Craft)
Accessories: Designer Circle Brads, Chocolate Chip 5/8" grosgrain ribbon, silver brads
Tools:  Square punches, hole punch (I still can't remember the name and my old catalog is buried in a box in the depths of my closet...and it's late and well you get the picture.)
I also used sandpaper and sponges, hence the title.

Happy Stamping!
-Staci

Thursday, September 1, 2011

Here comes Fall

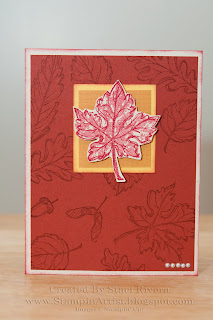
It is so hot here (in Tucson) that it is hard to believe that it is September.  As the calendar turns, my anticipation for cool crisp days increases.  Soon...soon.  So in honor of Fall, which is my favorite season, I made this quick card.  I used the new Gently Falling set from the Holiday Mini Catalog (pg 16 and 17.)  The holiday mini catalog releases today, yeah!  I just love all the accessories in this one- from several new kinds of ribbon to mini jingle bells.  I know!  Mini jingle Bells!


The Gently Falling has oodles of 2 step stampin' images.  I chose the maple leaf for the middle of this card because I liked the size of it.  It is a maple leaf, right?  I live in Arizona and before that in Florida so you will have to excuse me, I don't know my leaves.  I used my stamp-a-ma-jig to get it perfectly lined up.  See the video below for a 2 step stampin' tutorial and follow this link for a tutorial for the stamp-a-ma-jig.  The stamp-a-ma-jig video is not mine....
The main panel is created by stamping the outlines in Cajun Craze all over the Cajun Craze cardstock.  I tried to do this randomly.  Simple.  Fast.  Yet pretty.  Yeah!

Stamps: Gently Falling
Paper: Naturals Ivory, Cajun Craze, Daffodil Delight, More Mustard
Ink: Cajun Craze, Riding Hood Red
Accessories: Basic Pearls
Tools:  Stamp-a-ma-jig


Happy Stamping!
-Staci

Monday, August 29, 2011

In a Christmas kind of mood

Christmas in August???  Sure.  Why not?  I just love Christmas and it is NEVER too early to start working on those Christmas cards.  In years past I usually make a bunch of one card.  This year, thanks to my card clubs, I will have a variety of cards ready to go.  So this is the Christmas card that I designed for the girls this month.  It looks pretty simple except that I snuck in some embedded embossing just behind the ornament- take a look at the close-up.
I also added pearls to the swirls.  I thought that I wouldn't use the pearls all of the time.  But now that they are in my stash I use them a lot.
I punched out the Riding Hood Red piece and stacked it on the Early Espresso piece and then stacked that on top of the Marina Mist matte.  Be sure they are securely adhered together then place them in the houndstooth embossing folder and run them through the Big Shot.  And Voila!  you have created an embedded embossing card.  Easy, right? 


I used the Letters from Santa Designer Series Paper (DSP.)  I challenged myself to use one of the busier patterns.  Plus I couldn't bear to use the delicious stripes included in this paper pack.  I love striped paper and usually keep them in my stash for an extra long time because I admire them rather than use them.  How silly!  I did recently create a scrapbook layout with the stripes from this pack.  Maybe, I will get that online soon. 
Stamp Sets:  Delightful Decorations
Paper:  Letters to Santa DSP, Riding Hood Red, Marina Mist, Early Espresso, Old Olive, Whisper White
Ink: Old Olive
Accessories: Basic Pearls
Tools: Houndstooth Embossing Folder, Big Shot, Decorative Label Punch

Thanks for looking!  Your comments are appreciated.
-Staci