There is something really satisfying about using stamp sets that have been in your stash for awhile. So I was really pleased with myself when I used not one but two retired sets on the same card.
Making a card for my motorcycle loving husband called for use of this retired motorcycle stamp. I made this card for Father's Day and chose to put the sentiment on the inside of the card.
Stamps: Print Pattern, Motorcycle
Paper: Soft Suede, Basic Black, Naturals Ivory
Ink: Soft Suede, Staz On Black, Cherry Cobbler
Tools: Blender Pen
I started with Naturals Ivory paper and stamped the motorcycle in Staz On Black ink. I used a blender pen and Cherry Cobbler ink to color the tank. I then stamped the diamond pattern in soft suede on the soft suede cardstock. Distressed the edges and layered together.
Happy Father's Day!
-Staci
Inspirational creations for scrapbooks and cards by Staci Rivera, Independent Stampin' Up! Demonstrator
Saturday, June 18, 2011
Wednesday, June 15, 2011
Razzleberry Challenge and Blossom Bouquet Triple Layer Punch
Don't you hate when you have too much of cardstock of ONE color? I had an extra large stash of Rich Razzleberry. The past tense is because I sold it off shortly after showcasing it on this lovely card.
In any case, my personal challenge was to make a card with Rich Razzleberry. I also wanted to tryout the Blossom Bouquet Triple Layer Punch. This is the new triple punch featured in the summer mini catalog.
In the close up, you can see that I embedded the flowers in the card. They almost look quilted. This technique is called embedded embossing. I achieved this by gluing my punched flowers to the card and then embossing it in the big shot. I used the square lattice embossing folder. Pretty simple, right?
The last flower was added after the embossing in order to make it stand out.
The little shiny flowers were stamped with the little flower in the Bold Blossom stamp set (also found in the Summer mini) with shimmer paint. Apply the paint directly to your stamp by using a sponge dauber.
Ingredients
Stamps: Bold Blossom (W 123232, C 122232)
Paper: Rich Razzleberry, Pink Pirouette, Elegant Eggplant, Whisper White
Ink: Frost White Shimmer Paint (116854)
Tools: Square Lattice Embossing Folder (119976), Big Shot, Blossom Bouquet Triple Layer Punch (122464), 3/4" Circle Punch
I hope this has inspired a project of your own! Happy Stamping!
-Staci
Labels:
Big Shot,
Embedded Embossing,
Triple Layer Punch
Tuesday, June 14, 2011
Details for Dream Gardens
So I said I would be back with more detailed instructions and pictures.
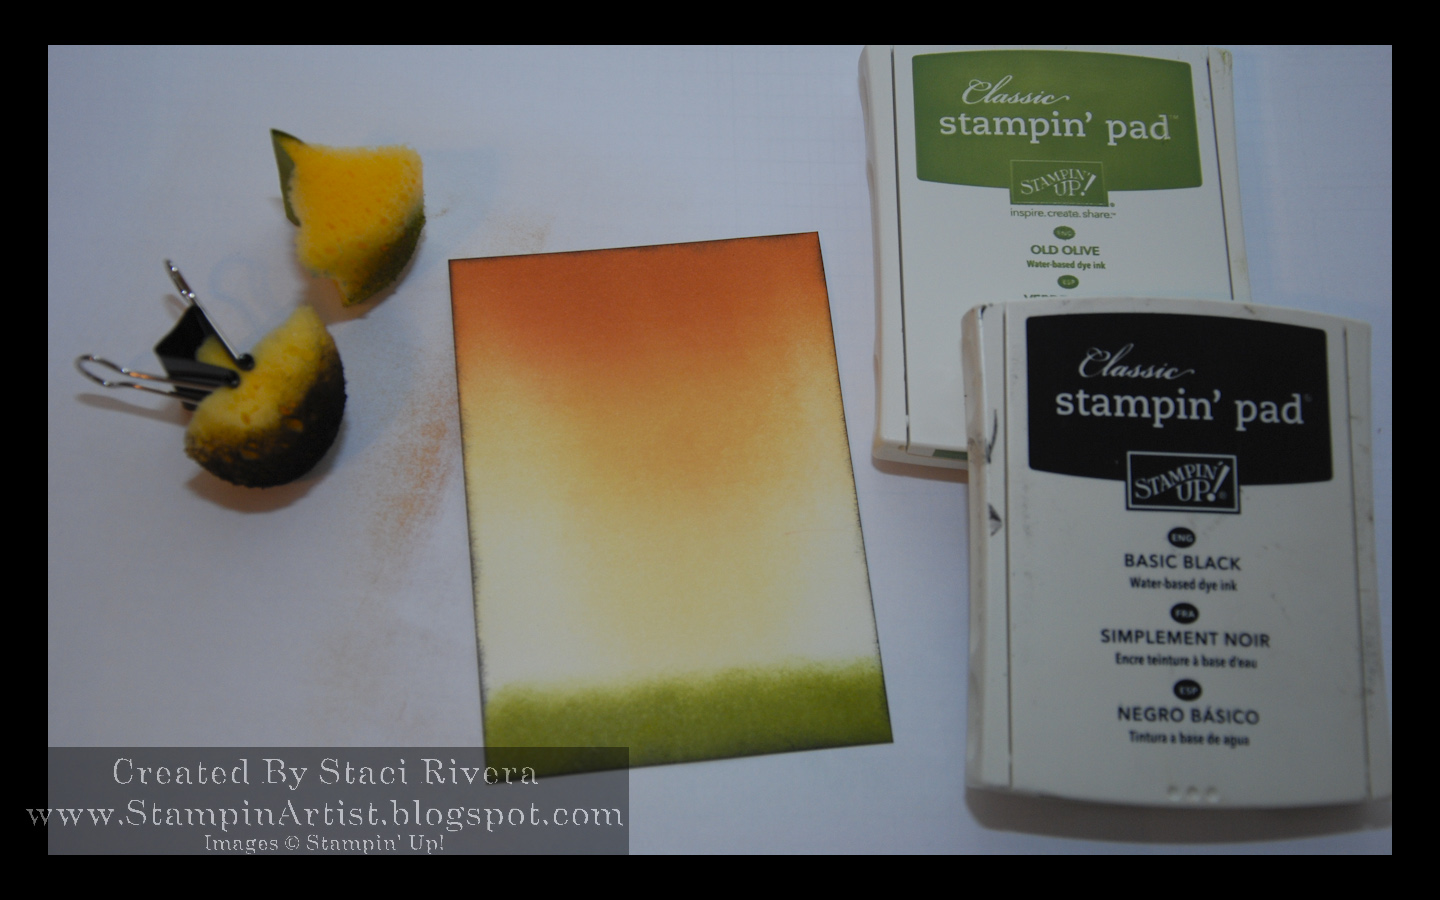
Well, I started by Brayering in So Saffron over a good portion of my whisper white cardstock. (Cardstock piece measures 4" x 5 1/4") Be patient with this layer. This is a light yellow and it takes a while to build up.
Then I brayered over the So Saffron layer with More Mustard. I only went about half way as far as I did the first layer.
Then I brayered a smaller portion at the top with Cajun Craze. Sorry no pics for these first few steps. But I think you can follow along without them.
The next step is sponging old olive along the bottom in order to make the grass. I also sponged all the way around the piece of cardstock with old olive.
I then stamped the silhouette stamp in Staz On Black ink. I used a stamp-a-ma-jig to get the positioning right. DO NOT stamp on your imaging sheet with Staz On. I probably didn't need to say that but just in case. Use Gray or Basic Black, Staz On is permanent. As a side note watch out when you use Staz On and clear blocks. I have one block that has a line on it from a Staz On incident.
Next cover the geisha with a sticky note. Leave just a sliver of the bottom of her showing.
The sponge a black shadow under her. I used a Q-tip to get it more precisely in the area that I wanted it to be.
All done. Just mount it to your 1/4 fold card. I used black just to make it more dynamic. See yesterday's post for a complete supply list.
Happy stamping!
-Staci
Well, I started by Brayering in So Saffron over a good portion of my whisper white cardstock. (Cardstock piece measures 4" x 5 1/4") Be patient with this layer. This is a light yellow and it takes a while to build up.
Then I brayered over the So Saffron layer with More Mustard. I only went about half way as far as I did the first layer.
Then I brayered a smaller portion at the top with Cajun Craze. Sorry no pics for these first few steps. But I think you can follow along without them.
The next step is sponging old olive along the bottom in order to make the grass. I also sponged all the way around the piece of cardstock with old olive.
I then stamped the silhouette stamp in Staz On Black ink. I used a stamp-a-ma-jig to get the positioning right. DO NOT stamp on your imaging sheet with Staz On. I probably didn't need to say that but just in case. Use Gray or Basic Black, Staz On is permanent. As a side note watch out when you use Staz On and clear blocks. I have one block that has a line on it from a Staz On incident.
Next cover the geisha with a sticky note. Leave just a sliver of the bottom of her showing.
The sponge a black shadow under her. I used a Q-tip to get it more precisely in the area that I wanted it to be.
All done. Just mount it to your 1/4 fold card. I used black just to make it more dynamic. See yesterday's post for a complete supply list.
Happy stamping!
-Staci
Monday, June 13, 2011
Goodbye Dream Gardens
I am really sad that Dream Gardens is on the retiring list. I am glad it is in my collection, just sad that I won't be able to make current samples for all of my customers. Thanks for shedding a tear with me.
I made this card in February just after I learned the brayering technique for colored backgrounds. Yes the orange and yellow is completely brayered. I did use sponges to get the green at the bottom and I used a sponge to add black. I will try and post more how to instructions and pictures tomorrow.
Stamps: Dream Gardens
Inks: Staz On Black, Basic Black, Old Olive, So Saffron, More Mustard, Cajun Craze
Paper: Whisper White, Basic Black
Accessories: None Gasp!
Tools: Brayer and Sponges
Thanks for looking!
-Staci
I made this card in February just after I learned the brayering technique for colored backgrounds. Yes the orange and yellow is completely brayered. I did use sponges to get the green at the bottom and I used a sponge to add black. I will try and post more how to instructions and pictures tomorrow.
Stamps: Dream Gardens
Inks: Staz On Black, Basic Black, Old Olive, So Saffron, More Mustard, Cajun Craze
Paper: Whisper White, Basic Black
Accessories: None Gasp!
Tools: Brayer and Sponges
Thanks for looking!
-Staci
Labels:
Brayer,
create background paper,
Dream Gardens
Sunday, June 12, 2011
Father's Day Card
As much as I wanted to play and play with all of the sneek peak items that I have. I have to switch gears and make a few pesky Father's Day cards. Boo! LOL!
So here is a very simple card. I used some old scraps of patterned paper that I had leftover from a scrapbook page. I knew that saving all those scraps would one day turn out handy!
I used the color spritzer tool and a Basic Black marker to add interest to the Blue panel. The blue is a retired Stampin' Up! color. I don't remember what color it is, maybe Buckaroo Blue. I also used the 1/8" taffeta ribbon which is fast becoming one of my favorite choices of ribbon.
Enabler's list-
Stamps: Something to Celebrate (Retired Hostess Set)
Paper: Patterned Scraps, Retired SU cardstock, Basic Black
Inks: Basic Black Marker
Accessories: Basic Black 1/8" Taffeta Ribbon
Tools: Color Spritzer
I hope this has inspired you. I'll be back with more soon. Until then, Happy Stamping!
-Staci
So here is a very simple card. I used some old scraps of patterned paper that I had leftover from a scrapbook page. I knew that saving all those scraps would one day turn out handy!
I used the color spritzer tool and a Basic Black marker to add interest to the Blue panel. The blue is a retired Stampin' Up! color. I don't remember what color it is, maybe Buckaroo Blue. I also used the 1/8" taffeta ribbon which is fast becoming one of my favorite choices of ribbon.
Enabler's list-
Stamps: Something to Celebrate (Retired Hostess Set)
Paper: Patterned Scraps, Retired SU cardstock, Basic Black
Inks: Basic Black Marker
Accessories: Basic Black 1/8" Taffeta Ribbon
Tools: Color Spritzer
I hope this has inspired you. I'll be back with more soon. Until then, Happy Stamping!
-Staci
Labels:
Color Spritzer,
Father's Day,
Manly,
Masculine,
Taffeta Ribbon
Thursday, June 9, 2011
In Color Birthday Wish
Here is my first sneak peek at colors and stamp sets that will be released July 1st.
Stamps: Happiest Birthday Wishes, Starburst Jumbo Wheel
Paper: Lucky Limeade, Pool Party, Island Indigo
Ink: Lucky Limeade, Pool Party, Island Indigo
Accesories: Whisper White 1/4" Grosgrain Ribbon
Tools: 1", 1 3/8", and 1 3/4" circle punches
That was fun!! I hope to share more new toys soon!
-Staci
Stamps: Happiest Birthday Wishes, Starburst Jumbo Wheel
Paper: Lucky Limeade, Pool Party, Island Indigo
Ink: Lucky Limeade, Pool Party, Island Indigo
Accesories: Whisper White 1/4" Grosgrain Ribbon
Tools: 1", 1 3/8", and 1 3/4" circle punches
That was fun!! I hope to share more new toys soon!
-Staci
Wednesday, June 8, 2011
Mojo Monday
I decided to try something new. I decided to participate in my first sketch challenge. Here is what I came up with:
I chose Pacific Point and Crumb Cake as my color combination. I used several products that are on the retiring list for Stampin' Up! I will be sad to see the Cogs Punch go (#118873). I also used my favorite Designer Series Paper (DSP), Blueberry Crisp (#117392) which will also be retiring this month.
Here is the original sketch:
I started by using 1" x 4" strips of paper. 2 are from the DSP and the other are plain Sahara Sand that I used Not Quite Navy marker and the color spritzer to splatter. I also used the Sandy Speckles wheel (#117651) to add more color to the Crumb Cake strips. I punched out a 1 3/4 circle from corrugated cardboard and decorated with a variety of brads I had in my stash. The ribbon is the 1/8" taffeta ribbon in basic black (#119261).
Happy Stamping!
-Staci
I chose Pacific Point and Crumb Cake as my color combination. I used several products that are on the retiring list for Stampin' Up! I will be sad to see the Cogs Punch go (#118873). I also used my favorite Designer Series Paper (DSP), Blueberry Crisp (#117392) which will also be retiring this month.
Here is the original sketch:
I started by using 1" x 4" strips of paper. 2 are from the DSP and the other are plain Sahara Sand that I used Not Quite Navy marker and the color spritzer to splatter. I also used the Sandy Speckles wheel (#117651) to add more color to the Crumb Cake strips. I punched out a 1 3/4 circle from corrugated cardboard and decorated with a variety of brads I had in my stash. The ribbon is the 1/8" taffeta ribbon in basic black (#119261).
Happy Stamping!
-Staci
Subscribe to:
Posts (Atom)